Exercise— 3 CREATING AN APPLICATION LOAD BALANCER FOR THE VPC
creation of application load balancer for VPC the pre-requisites that are required for this application load balancer are
- An AWS account
So an application load balancer is nothing but a load balancer serves as the single point of contact for clients. The load balancer distributes incoming application traffic across multiple targets, such as EC2 instances, in multiple Availability Zones. This increases the availability of your application.
Now let us look into the steps required for creating a application load balancer
- First in order to create a load balancer we need a VPC with different subnets associated with different regions so go ahead and first create a VPC first with following configurations
2. Now I am going to create four subnets where I use each of two subnets as private and public respectively with different regions for each of them in private and public respectively go to subnets section in your AWS console and click on create subnet enter the configurations as given in the below
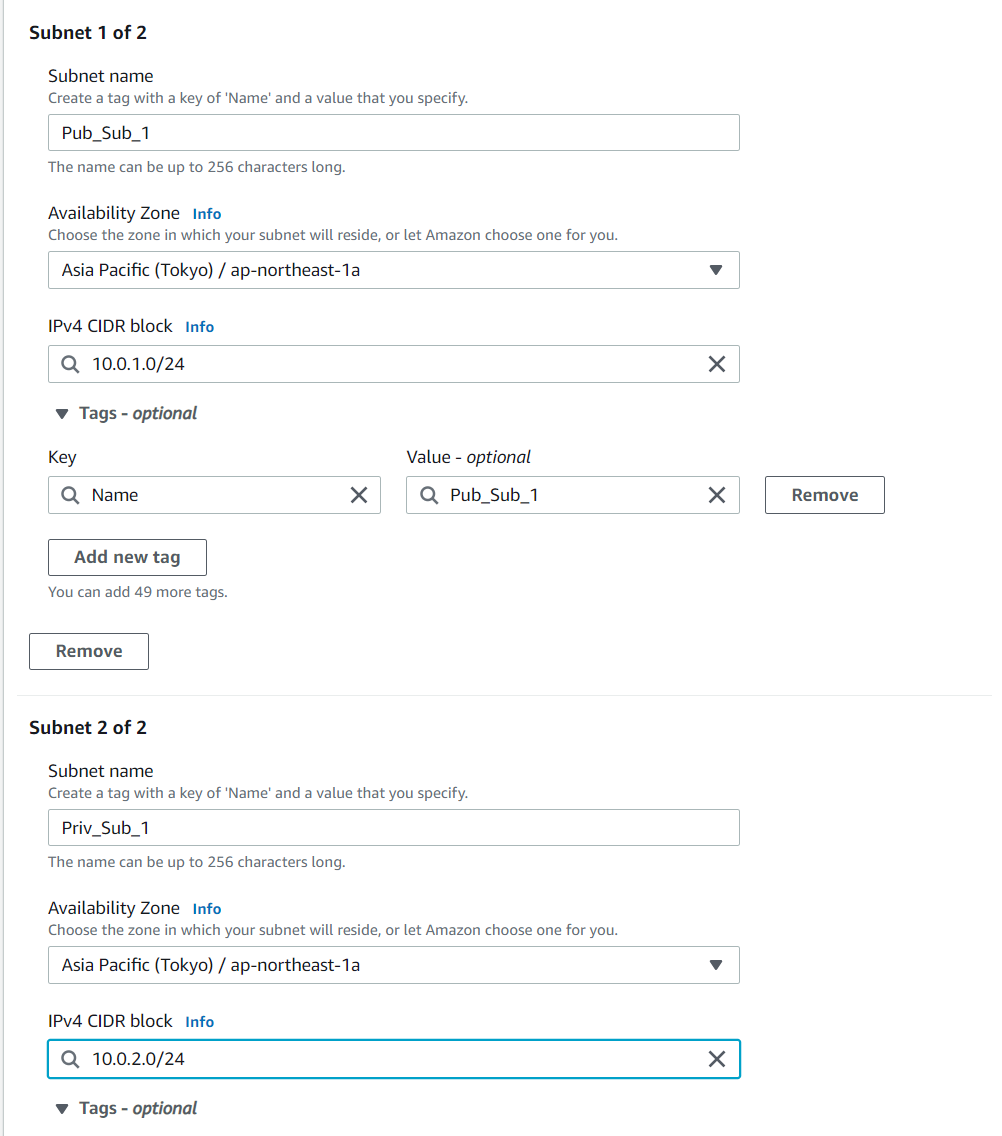
Similarly create two other subnets with different regions and Ip addresses
Note: You can use any Ip address as long as it does not overlap with any of the subnets
After creating all the subnets it should appear like this in the subnet section3. Phew, Now we have to create IGW (Internet gateway) and add them as a route in route table of public subnets in order to provide access to any IP address from the outside world and a NAT gateway for private subnets let’s proceed then…
Go to internet gateway section and create a IGW as follows
Now go to NAT gateway section and create a new NAT gateway with pub subnet_1 as the chosen one and also allocate elastic IP by clicking the button
4. Now it’s time to create route tables I have create two route tables namely pub_table for public subnets and priv_table for private subnets refer the below images for more clarification
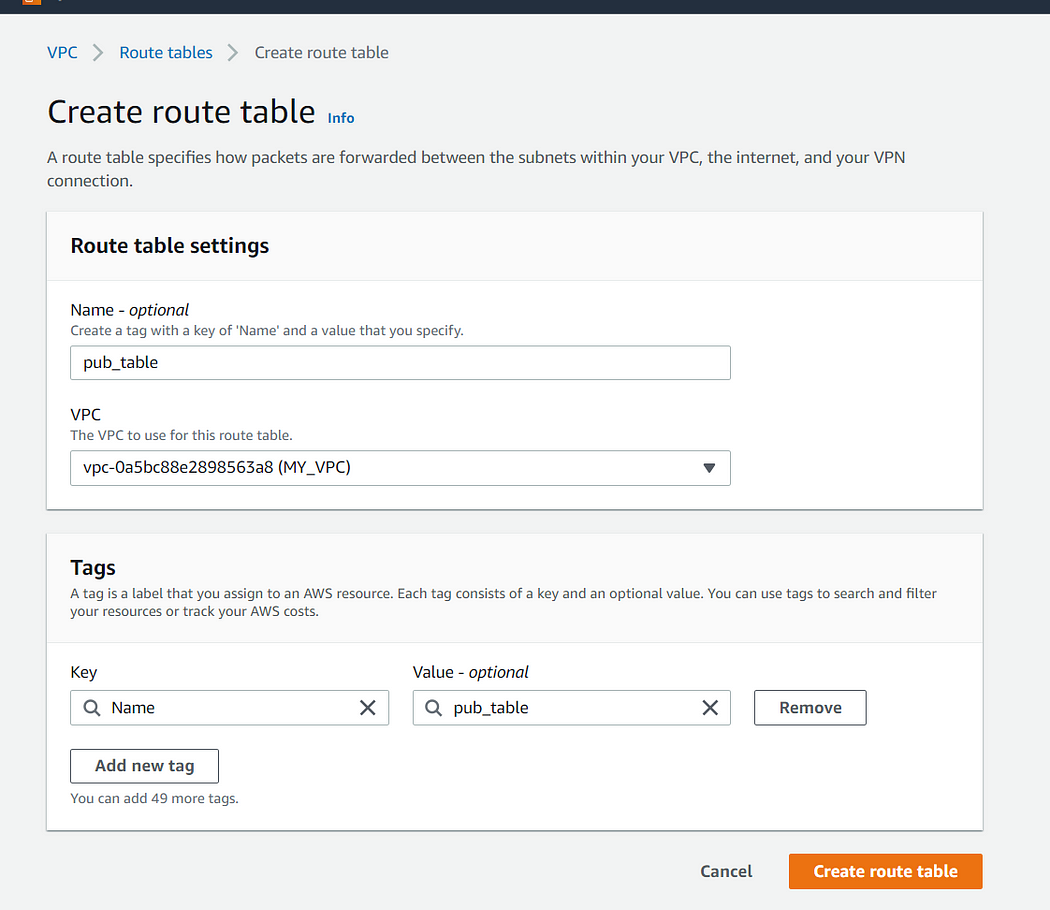
now navigate to this table and click on edit routes which can be opened in the following way

After clicking on edit routes add the following routes in pub_table

Similarly create a priv_table the only difference here is we add nat gateway route instead to IGW gateway

5. The next step is to map this tables to the respective subnets which can done using the option edit subnet association option

Add the public subnets to pub_table and private subnets that we created earlier to priv_table
6. Now it time to create Ec-2 instances for our private subnets so head over to ec-2 dashboard and click create instance name the instances and in network settings tab click on edit change the VPC to the one we have created now and also assign private subnet in the subnet section as follows
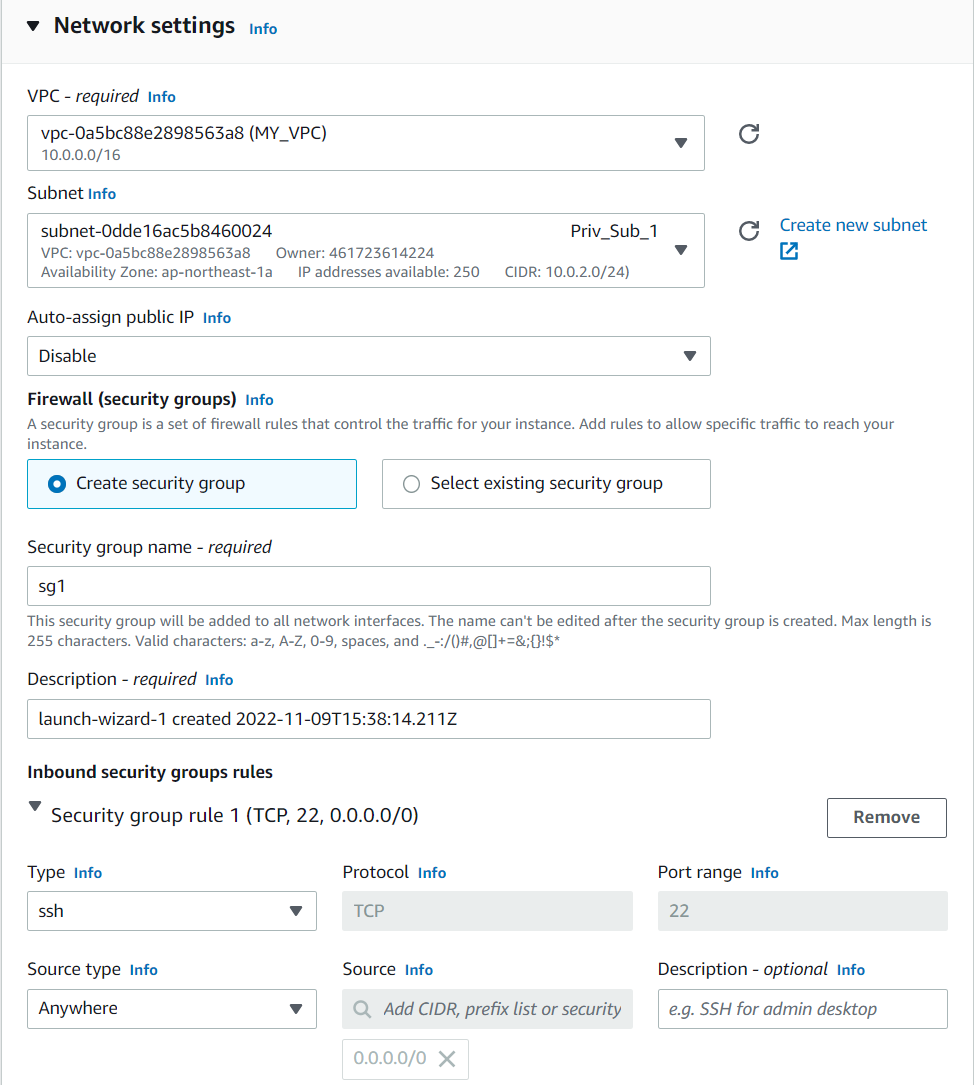
Also create a security group for now allowing ssh connection we will edit this one after creating a load balancer
Now navigate to advanced details tab and paste the following in the user data text area
#!/bin/bash
yum install httpd -y
systemctl enable httpd
echo "<h1>This is instance 1</h1>" >/var/www/html/index.html
systemctl start httpd
Note for another instance with different private subnet use the below code to differentiate ec-2 instances that are connected to a load balancer
#!/bin/bash
yum install httpd -y
systemctl enable httpd
echo "<h1>This is instance 2</h1>" >/var/www/html/index.html
systemctl start httpd
You can use the same security that you previously created for the first instance here also
7. Now its time to head to our load balancer section and click on create load balancer choose application load balancer use the following configurations as given in the images
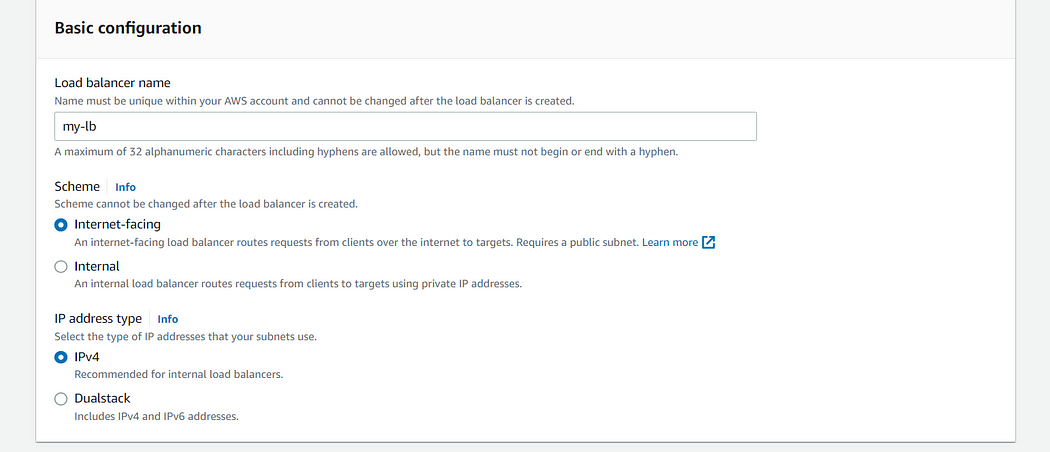
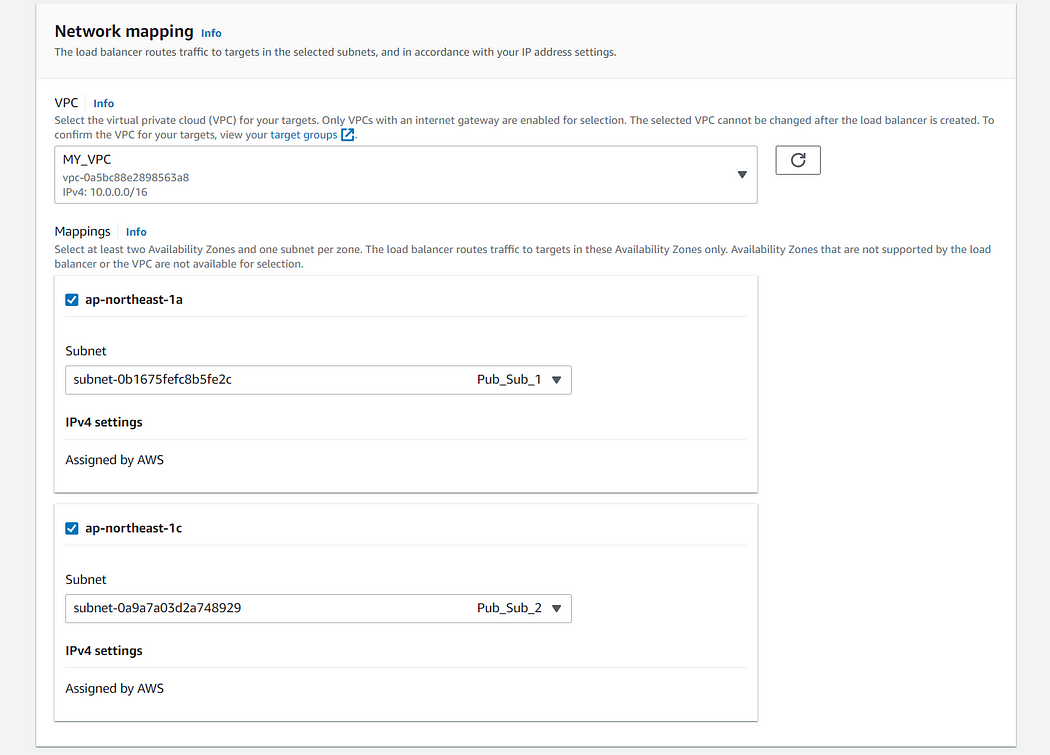
In security groups tab click on create new a add the following inbound rules
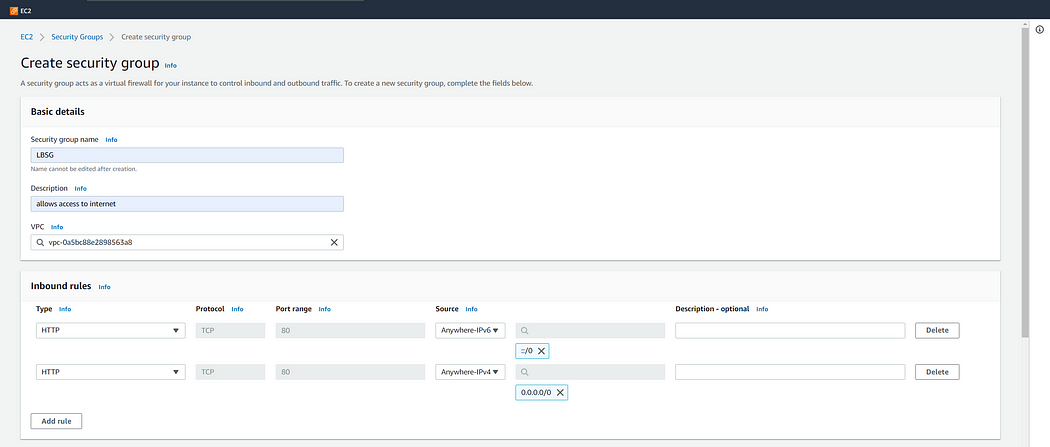
Now choose this security group in the load balancer tab In listeners and routing section create a new target group and add the ec2s previously created into the target group leave the group details section as such and proceed to register targets
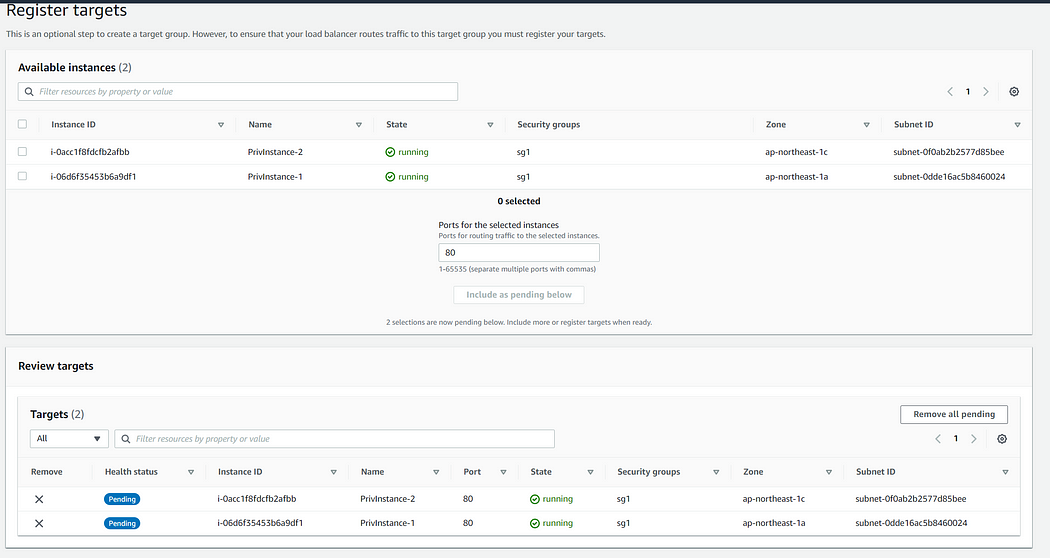
7. Bare with me for some more time we are almost there, one final step is now to add the new security group we have created to the ec-2 to security group that was created earlier

I am adding the LBSG security group which is new security group that was created for the load balancer to Sg-1 (ec-2 security group) save the changes and look into health status of target group by navigating that respective section once the status of the instances become healthy you are ready to test the load balancer
Navigate to load balancer tab and copy the DNS name, paste the URL in a new tab

You will notice the following website with the following pages after successive reloads now we can confirm that our load balancer is working as expected

 Ensure that you always choose the right VPC while creating security groups and also create all the instances vpc’s in one region .Also very very important one the elastic ip service used for nat is billed so remove the service and delete the vpcs after completion
 - So before getting into the steps let us try to understand what exactly is application load balancer and how it works…


Comments
Post a Comment